- Design Your Room
- AI Design
- Explore
- Blog

Easy, No-Sew Faux Fur Christmas Tree Skirt

Christmas time is finally here! And every year, new holiday projects always seem to make their way into our busy schedules. This year’s list includes a new tree skirt for Tammy’s Christmas Tree. Basically in the house, the tree looks like the size of Griswald’s tree… Go big or go home… Right?
Anyways! The current tree skirt isn’t big enough for the base of the tree. We needed to either buy or make a new tree skirt. Knowing us, we’re always going to go with the latter of the two. Especially, when larger tree skirts could cost well over $50 (no thanks).
Just because we like to make our own decor sometimes, doesn’t always mean we want it to be super complicated. The easier, the better for us (cutting corners is kind of our thing). We came up with the idea of making a no-sew tree skirt, that said “soft, warm and cozy”. Pretty sure faux fur fits that description! So, we headed to Jo Ann Fabrics to search for the perfect Faux Fur.

This post may contain affiliate links where we earn a small commission on your purchases at no additional cost to you.
We ended up going with the Cheshire Taupe Faux Fur. Because we needed a large tree skirt, we knew we were going to need every inch we can get. The fur was listed as 57″ in width, which was perfect! We decided to get 1 3/4 yard of fabric, just to be safe. The total cost was about $32 – not too bad!
The tree skirt ended up being one of the easier projects we’ve done! Just the style and size we were looking for. It really warms up the area too.
NOTE: If you have an average tree size (6-7ft), and looking to make a standard tree skirt size (around 48″), you could easily go about a 1 yard and 14 inches to be safe (that's giving it 2 extra inches since some cuts made by the store are not always straight).

The Supplies
- Faux Fur Material
- Fabric Scissors
- Sharpie
- Tape Measure (or yard ruler)
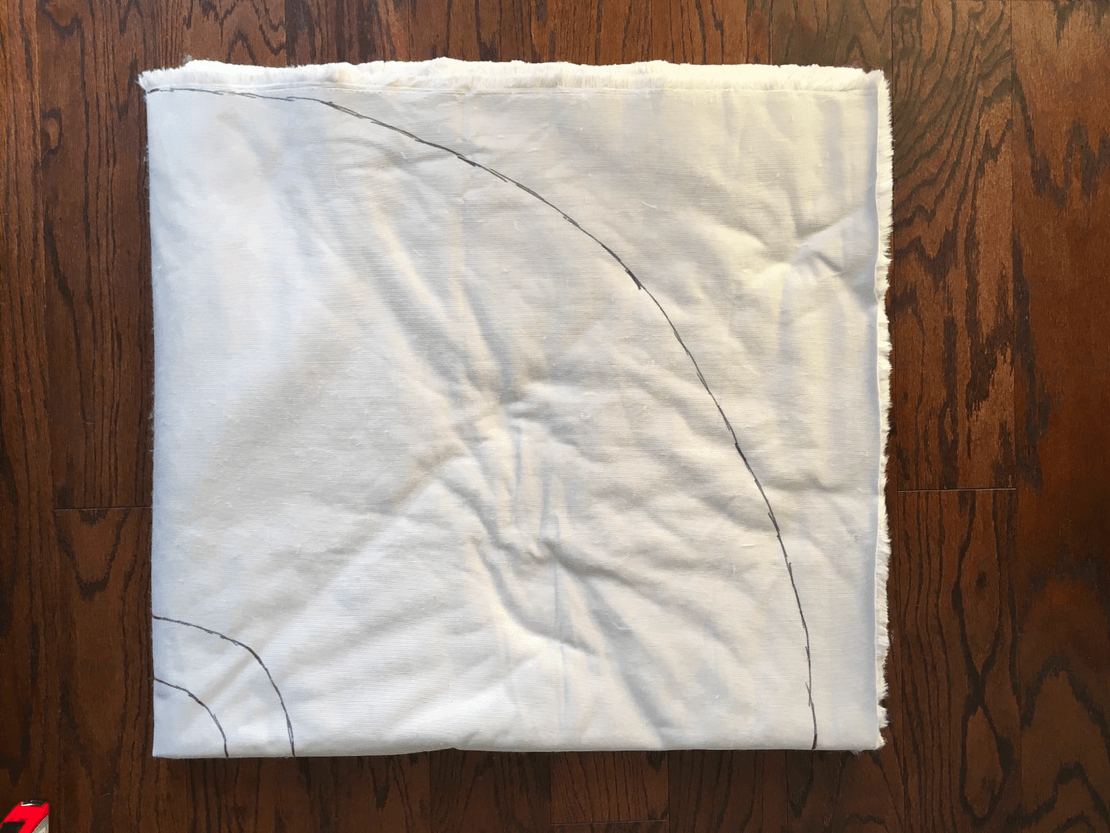
Step 1 – Fold Fabric
The first thing you want to do is fold the fabric into a square. This will be the easiest way to get an even circle. Now, if you have a dog, you’ll notice it might not be the easiest thing to do… He thought we folded it for him to lay on (insert eye-roll).

Step 2 – Mark Lines
Once you’ve folded your fabric into a square (and removed the dog off of it), you’re going to want to measure out half your circle diameter. Ours was 28.5″. From the corner of your fabric, you’re going to take your tape measure and layout it down, then mark your lines at the end of the tape measure. We ended up marking 5 lines.
Now, do the same for the smaller circle, for the tree trunk. A good opening size would be around 6″ in total. You could go smaller, depending on your tree trunk area. Again, you will want to measure half of your diameter, which is 3″. You’ll notice we forgot about the whole “measure half of your diameter” for this part of the project. Hence, the second circle marking in the pictures later on… oops. Good thing we caught the mistake before cutting!

Step 3 – Connect Lines
Once you’ve made all your marks, you’ll want to use your sharpie to connect those lines together, so you have one big line to cut off of.
– tip –
The more lines you make in Step 2, the easier it will be for you to connect all the lines together.
Step 4 – Cut
This is where things get a little tricky. Since the fur is so thick, you won’t be able to cut all 4 layers of fabric at once. It was a bit difficult cutting, but we did 2 layers at once (there we are cutting corners again). It’s probably a better idea to cut each layer.

After we cut the top 2 layers, we went ahead and re-marked our lines on the 3rd layer. This ensured we would still have an even circle. Once we finished marking our lines on the 3rd layer, we pulled back the first 2 layers and made our final cut for this section, with the remaining 2 layers.
– side note – At this point of the project… there. is. fur. EVERYWHERE.
Step 5 – Cut Inner Circle
This is a repeat of step 4, but the inner circle – is for the tree trunk. We did 2 layers at a time for cutting. However, we did feel confident (lazy might be the better word) that we didn’t need to mark our lines on the 3rd layer. We just cut using the top 2 layers as a guide.

(that other line is our mistake we talked out earlier. It happens to the best of us!)
Step 6 – Cut Slit
To be able to wrap your tree skirt around the tree, you’re going to want to cut a slit in the fabric, so you can wrap it around the base of the tree. To make things easier, we kept our fabric folded in four, and just cut down the edge of the very top / first layer only.
– side note – To be “extra” you could even add some ribbon or buttons to the slit so you can easily tie it, or button up, if you don’t want the fabric to just overlap.


Once you’ve completed all your cuts, we highly suggest taking your fabric outside and giving it a good shake, or two. This way, there will be no more shedding. I mean, look at all the fur everywhere!

Now, wrap it around the base of your tree and you’re done!


Doesn’t it look so cozy and warm? We were surprised at how simple and easy it can be to make a tree skirt AND it took less than an hour to put it together. (Say whatttt!)
What do you think of this tree skirt?
This article was written by Tammy & Sarah from Sammy on State.
Meet The Authors
Tammy and Sarah are coffee-loving, UI/UX designers who work together in downtown Chicago. They may have a passion for digital design, but both have a lil’ side thing for home design.
Follow them as they share their adventures through each of their first home renovations, DIY projects, home decor, love of food, and occasional design freebies!

 22h left